3d Printing @ M|I|C/A
Access
Our 3d printers are available to all students who have received an introduction through MICA Coursework. Student re-certification is not necessary each semester, so long as your files come in correctly;)
Use Guidelines
All 3d printing is managed through the Remote Production Service. Please do not load or unload our printers yourself, unless under direct supervision of shop staff.
All prints must have a job sheet, which is created in your Remote Production Service submission.
If you are interested in learning in a more hands on way let us know in the submission and we will do our best to work with you!
Materials
If you're in a class, materials are provided to you for assignments and coursework.
Students are responsible for providing filament when usage is above 200g in one submission, when specific colors are desired, or after you exceed 500g in the semester.
Departments are responsible for providing filament for curricular engagement with the Remote Production Service, contact McKibbin for details.
If you are on a dFab computer, the software is already installed, skip to step 3
- Download the most current version here: https://help.prusa3d.com/en/downloads/
- Select the download for Windows, Mac or Linux under "Drivers & Apps" then install

- Open PrusaSlicer and make the following selections in the Configuration Wizard. You can return to this at any time by going to Configuration > Configuration Wizard.
- In Prusa FFF, first click the None button, then pick 0.4mm nozzle on the MK3s

- In Filaments, first click the None button, then pick PLA and choose Prusa PLA and Prusament PLA

- In File Association, associate all file types.

- In View Mode, use Advanced mode and use inches

- Choose Finish
- In Prusa FFF, first click the None button, then pick 0.4mm nozzle on the MK3s
- Use 0.2mm SPEED print settings

Double check that your screen looks like this when you open PrusaSlicer- Advanced user interface is selected
- Print Settings are 0.2mm SPEED
- PLA filament
- Printer is MK3S
- Infill is 20%
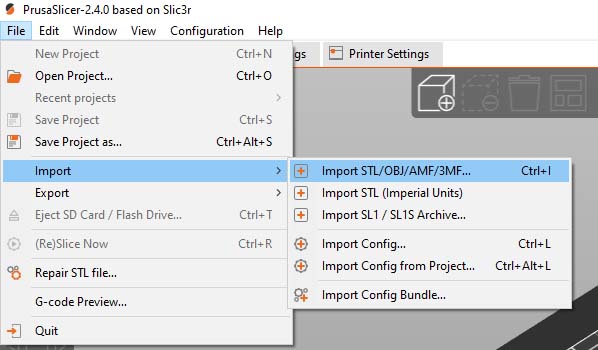
- Drag and drop your *.stl on the build plate or choose File > Import > Import STL
- Play! Don't forget to have fun for a minute.
Overhangs that are more than 45 degrees will need support, and your part will need to have substantial surface contact with the build plate. If your *.stl wasn't closed or had non-manifold edges, check each print layer for voids after repairing and slicing your mesh in PrusaSlicer.
- After slicing and reviewing your file with your instructor for print-ability, save the *.3mf file by choosing File > Save Project and submit it to the Remote Production Service for printing.

PrusaSlicer Introduction and Download - Downloads and features
PrusaSlicer Documentation - Primary reference to learn functions and features
Features Overview Videos
PrusaSlicer 2.0 release!
- Overview of some standard features
PrusaSlicer 2.1 Release! Undo/redo, perspective camera and more!
New features in PrusaSlicer 2.4 - MMU painting, improved supports and more!
Learn More!
Paint on Supports
Modifier Meshs
3d Printing Basics! (Ep1)
3D Printing Basics: Part names, care and filament types! (Ep4)
3D Printing Basics: Where to get printable models! (Ep5)
3D Printing Basics: The Slicer! (Ep6)
3D Printing Basics: What printing actually looks like! (Ep7)
3d Printing Basics: Before you print - design and print space requirements! (Ep8)
3D Printing Basics: When things go wrong! (Ep9)
3D Printing Basics: What Now? (Ep10)
Sometimes you want to 3d print something that is just way to big to fit on a printer. Below is a strategy that will help reduce confusion and speed up the process.

Step 1 - Rhino
Break the model into pieces that are small enough to print. Use alignment holes to key the printed parts back together once they are printed.

First, create boxes that surround the part, and have seams where you want the parting lines

See how we can use these to split up the model into a bunch of parts? Grasshopper aids in the process.

Once you are sure you have divided up the model exactly how you want it, bring the whole model into PrusaSlicer. No need to orient the parts flat on the construction plane, we will do that in the next step.
Step 2 - PrusaSlicer
Import the *.stl into PrusaSlicer. We will only use one instance of PrusaSlicer for all 20 prints, this way we can easily change the print settings for all prints at once in one place.

Your file will show an error when you first load the *.stl. Split the model into objects, noted in red in the above screen shot. Be sure you are in Advanced mode.

After breaking up the model into objects, the next step is to place all of the objects on their flat faces and inside the build area. Notice all the objects on the panel to the right, they are all selected, you must select one of them before editing it.

Use the Orient tool to place the parts flat on their face. Once you have placed a part, turn visibility off. It's helpful to start with the lowest pieces first and move to taller pieces last. Track what you have done by turning the visibility off each time you have oriented a part.

Now that all the parts are neatly oriented on the build tray, we can figure out our print settings, test them on one example part, and then batch process all of the prints. This is how large files should be submitted to RPS for processing.

Notice the use of a large brim, this helps keep the part flat on the table so that there is less of a seam when the two halves are glued together. All parts warp off of the bed to some degree, the brim minimizes this effect.
Step 3 - Filament Calculation
Notice that after you slice, there is a "Sliced Info" pane.

Start making a spreadsheet that has the filament usage in grams per part. I like to add the time to the spreadsheet too, but that is up to you.

Here are all the parts from this model. I can easily now calculate my total material usage, cost and print time.

Excel has a filter function. If you use headers for your column, it will automatically work really well.

This is how the file looks after I'm finished printing. I like to sort by print time so I can send the short ones early in the morning, and the long ones over night.
Submitting Large Projects to RPS
We will do our best to process larger projects, but depending on scope we can not guarantee that our turn around will meet your deadline. Coursework for dFab classes will be prioritized over large prints. Do not expect to have large prints completed in the last 4 weeks of the semester.
It will go a long way if you run the calculations and submit some test prints before sending a large project. Get the workflow figured out and after running a couple test prints, schedule a meeting with McKibbin to be sure everything will go smoothly.
Check your connections and finishing methods on the test prints, and use them throughout your process as test pieces for post production or mold making.
Higher grade filaments are sold with consistent color between rolls, less expensive filaments tend to vary quite a bit in sheen and hue. Buy extra filament, 120% is a good figure. Some prints will always fail.
Basics: How to post-process your 3d Prints!
Gluing
Zap-a-gap, 1-5 minute epoxy, or various types of rubber cement are suitable for adhering prints together.
Coatings
Most paints and epoxies work well as a way to color or coat your print
Smoothing
Acetone does not work on PLA as a smoothing agent. Low detail surfaces can be smoothed quite easily by building up layers of epoxy, bondo, or automotive filler-primer then sanding. If the added strength of epoxy is not needed, use other less expensive methods, such as wood filler or joint compound to fill large gaps before sanding.
Lost PLA - Investment Casting
PLA can be used in the same way we use microcrystalline wax in the foundry. just add sprues and a cup and you're ready to dip in the SuspendaSlurry.
Silicone Molds
2 Piece Silicone Rubber Mold
Replacement Tail Light